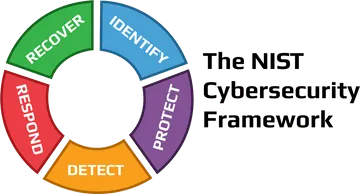
In 2014, the NIST Cybersecurity Framework (CSF) took the world by storm, aiming to help organizations to improve their ability to prevent, detect and respond to cyber attacks. It has been translated to many languages and is used by the governments of the United States, Japan, Israel, among many others. The Trends in Security Framework Adoption Survey, conducted in 2016, reported that 70% of the 300 surveyed organizations view NIST's framework as a security best practice, but, that same survey also found that 50% of those organizations saw the high level of investment that it requires as a barrier to adoption. As a result, the majority of organizations using it are only using part of the framework, due to the cost and lack of regulatory pressures. Perhaps you're one of those organizations or maybe you're one of the massive number of organizations looking to adopt the NIST Cybersecurity Framework in the near future? Here at SimpleRisk, it seems like a week doesn't go by where we don't talk to somebody looking to adopt the CSF. That's why we decided to do something about simplifying your approach to adopting the NIST Cybersecurity Framework.
For those who are new to SimpleRisk, we describe ourselves as a comprehensive GRC solution that is simple, effective and affordable. Our "SimpleRisk Core" offering is free, open source, and provides all of the basic Governance, Risk Management and Compliance capabilities that an organization needs to get started. From there, we provide what we call "SimpleRisk Extras" which are plug-and-play modules that provide enterprise features and functionality that extend the SimpleRisk Core. What I'm about to describe to you takes advantage of functionality provided by two of these SimpleRisk Extra modules:
- Import-Export Extra: The Import-Export Extra is for those who want to be able to import data into SimpleRisk or export data from it. It provides CSV import capabilities for risks, controls, assets and asset groups. It also provides integrations to import risks and assets from the Rapid7 Nexpose and Tenable.io vulnerability management tools. It adds the ability to export to a XLS file from within our Dynamic Risk Report. However, more importantly for this discussion, it provides a "one-click" import of a variety of control frameworks.
- Risk Assessment Extra: The Risk Assessment Extra provides enhanced functionality to perform both internal and external risk assessments. It allows you to create your own, custom, questionnaires with "Multiple Choice" or "Fill in the Blank" answers to your questions. These assessments can be emailed to contacts and the results can then be tied back to control audits or create new risks. For this discussion, the Risk Assessment Extra provides a "one-click" import of a variety of risk assessment questionnaires.
We begin by getting our SimpleRisk instance up and running using the instructions found here. You'll find instructions on installing SimpleRisk with an installation script, as a virtual machine, in a Docker container, and more. Most SimpleRisk installations only take a few minutes to complete.
Once we have SimpleRisk installed, we want to register our SimpleRisk instance. SimpleRisk should prompt you to do this upon your first login, but you'll also find this functionality under the Configure -> Register & Upgrade menu. Registering your SimpleRisk instance provides you with two main benefits:
- Registered instances receive our free Upgrade Extra, which provides a one-click Backup option as well as a one-click Upgrade option. While you can certainly do a manual backup or upgrade without it, this is a far more convenient alternative.
- Registered instances also have access to our free ComplianceForge SCF Extra, which is a common control framework, integrated into SimpleRisk, that provides 875 security and privacy controls expertly mapped across 143 different frameworks.
Registering your instance is required prior to using any of our SimpleRisk Extras, including the Import-Export and Risk Assessment Extras mentioned above.
Now that we have our instance registered and have purchased our Import-Export and Risk Assessment Extras, the next step is to install our NIST Cybersecurity Framework. To do this, we select "Configure", followed by "Content" and here we will see a large list of possible frameworks we can click to install:
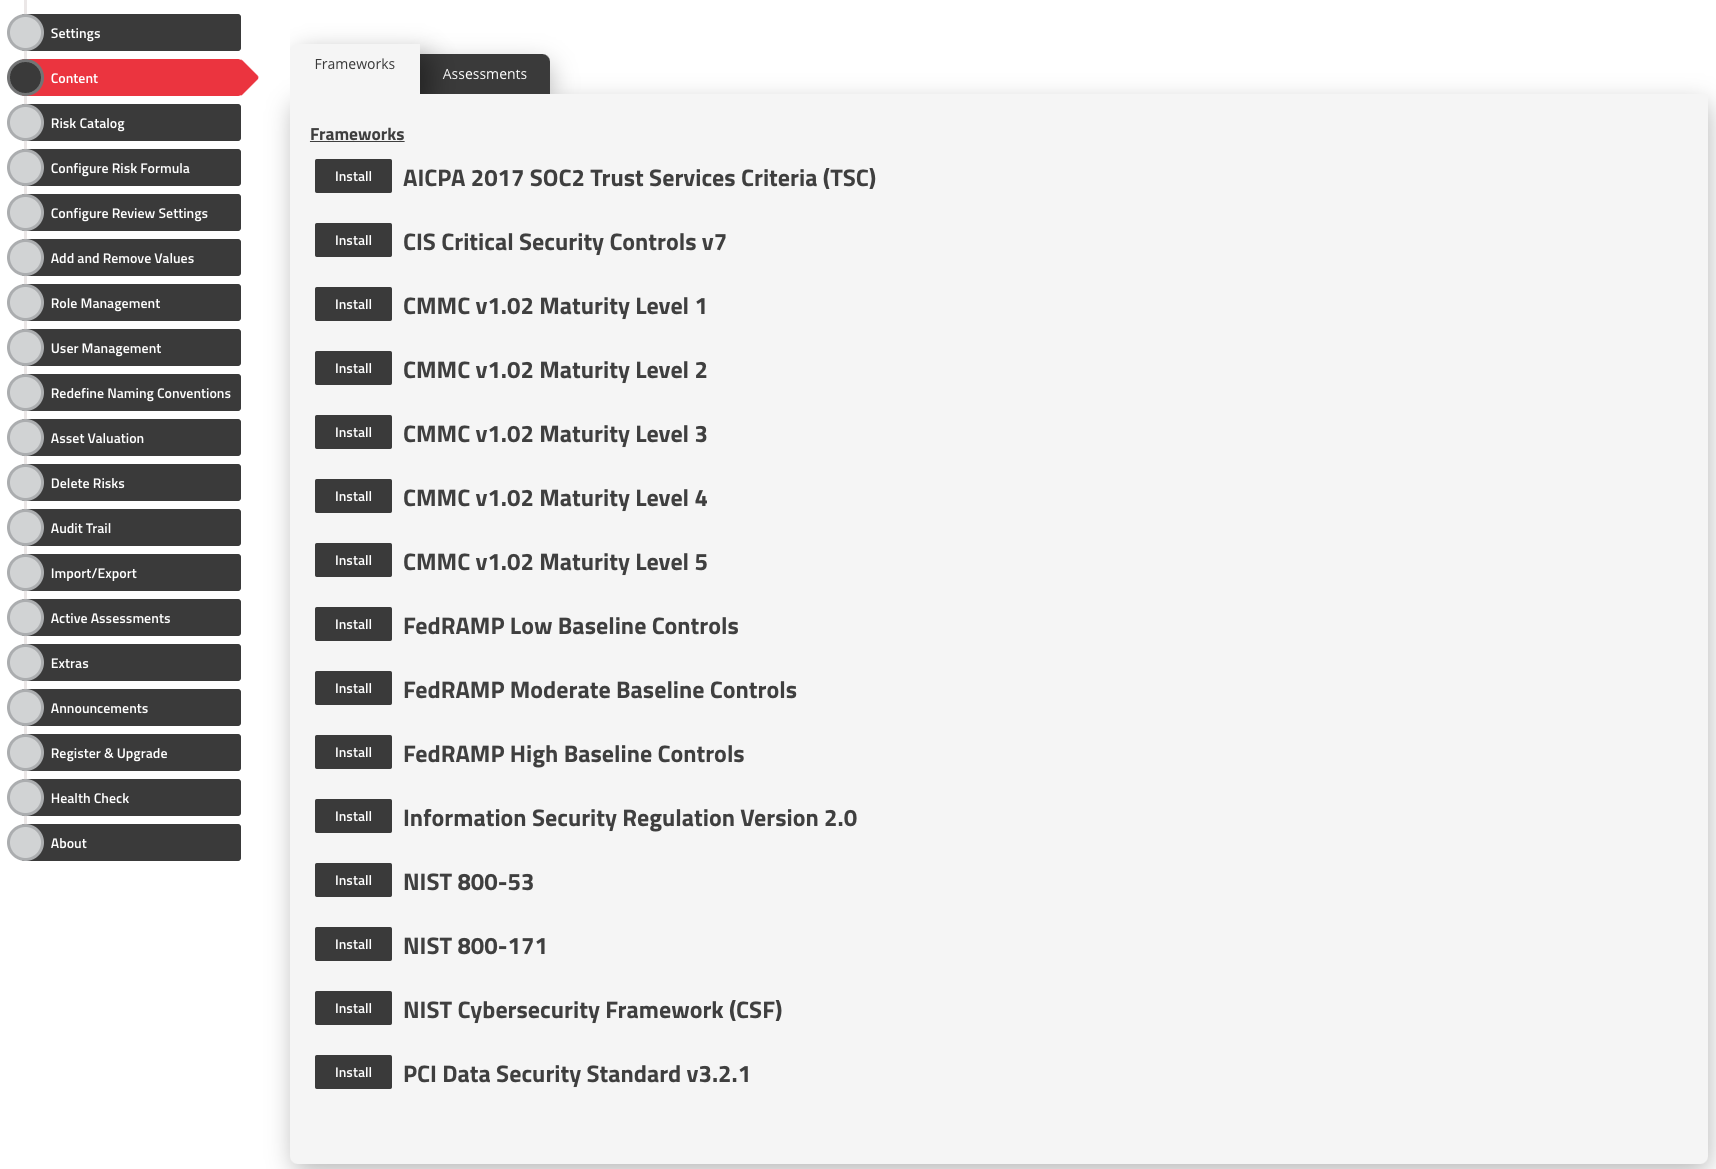
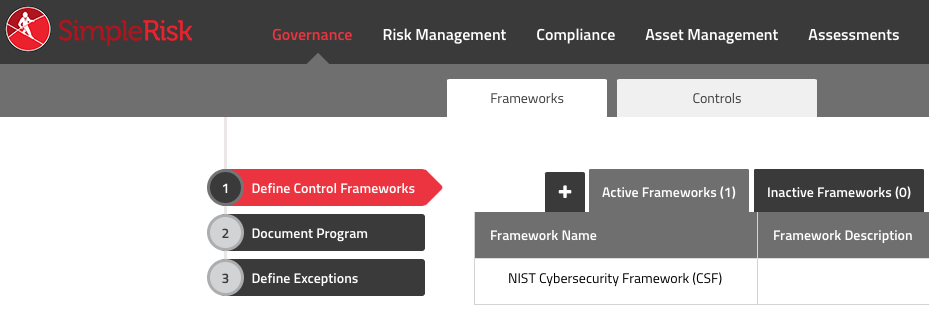
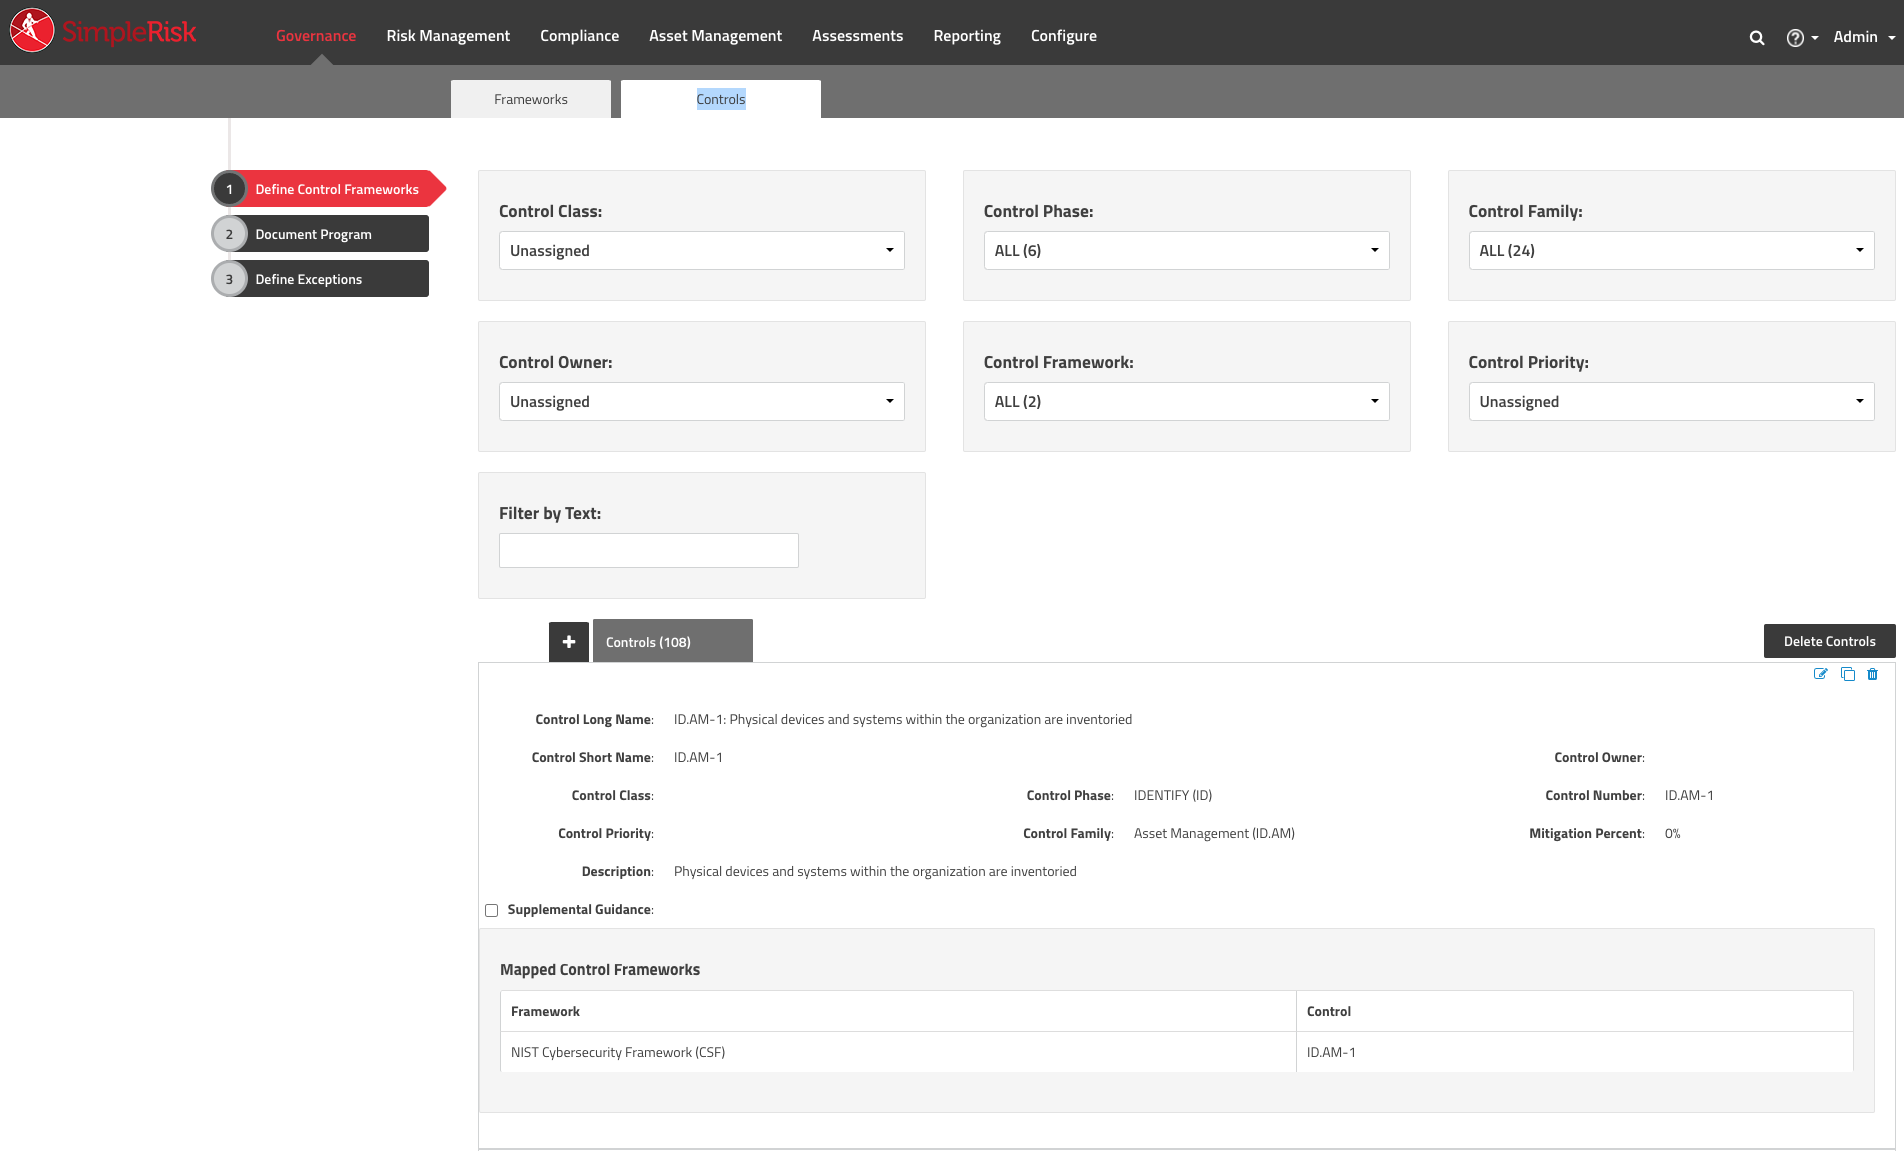
Since we want to install the NIST Cybersecurity Framework, we simply click on the "Install" button next to that framework name. It should then provide some output showing you the list of the 108 controls that are created as part of the CSF. If you select the "Governance" menu at the top, you will now see an Active Framework named "NIST Cybersecurity Framework (CSF)".
Clicking on the "Controls" tab will show you the list of all of the NIST CSF controls that were created and you can further filter to find a specific control that you are looking for to copy, edit or remove it.
Now that we have our NIST Cybersecurity Framework installed, we can install our related assessment. To do this, go back to the Configure -> Content menu and click on the "Assessments" tab. Now you should see a list of the "one-click" installable Frameworks in SimpleRisk.
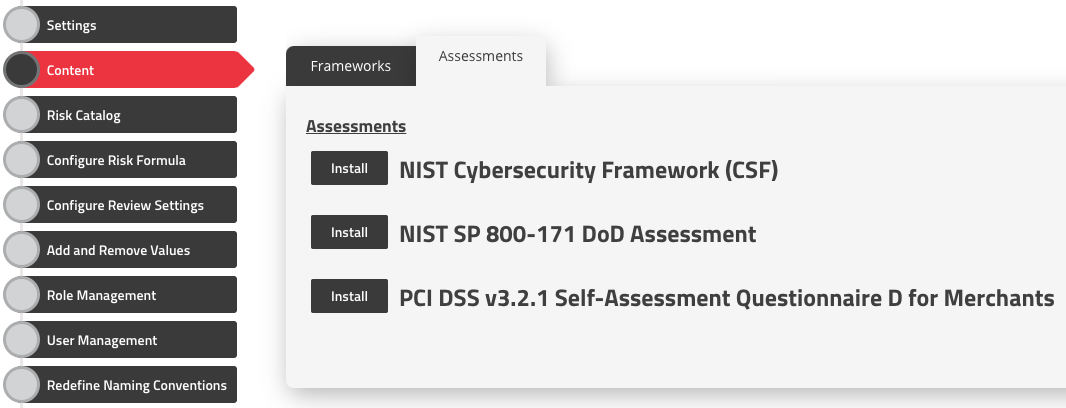
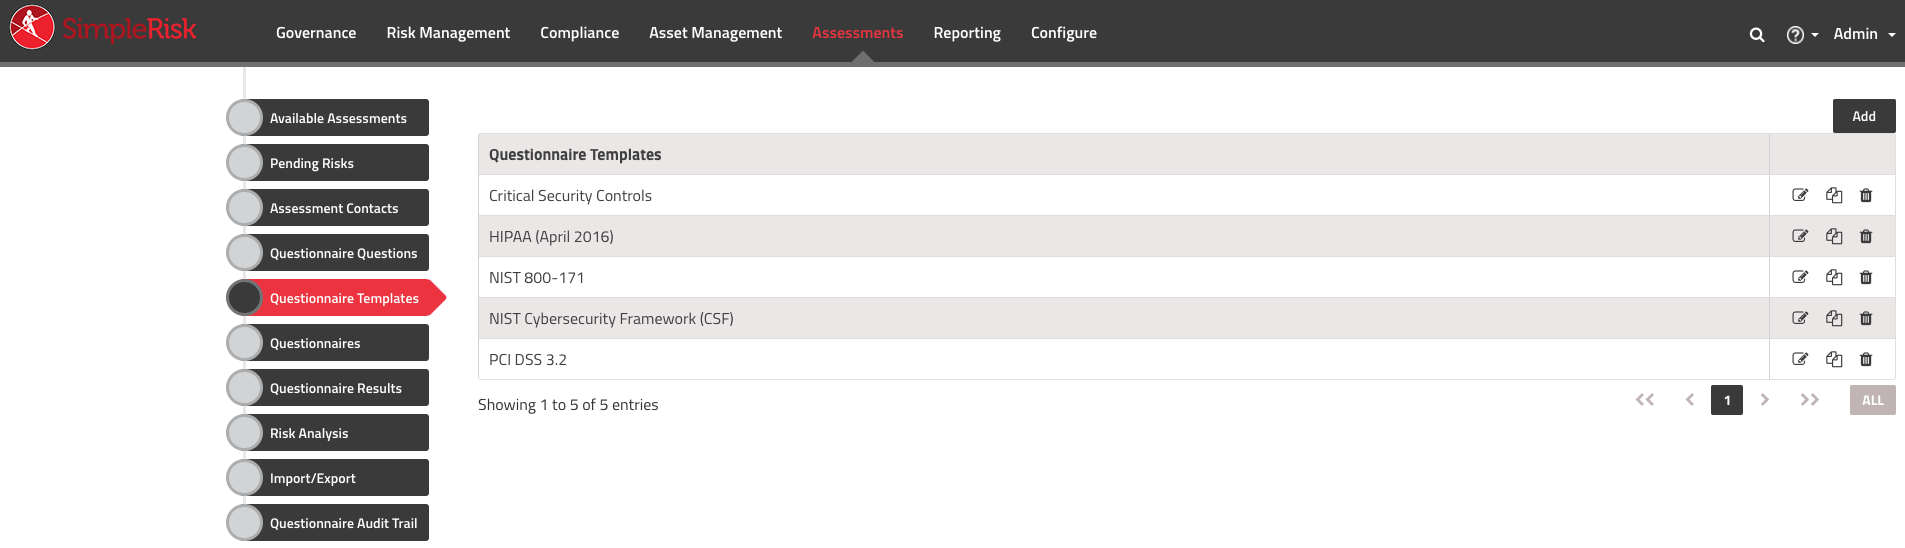
Again, to install this assessment, we simply click on the "Install" button next to the "NIST Cybersecurity Framework (CSF)" name. It may take a few seconds, but the system will download and install the assessment and automatically link it to the controls that we previously populated in Governance. We can check this by going to our "Assessments" menu at the top and selecting "Questionnaire Templates" from the menu on the right. We should now see a "NIST Cybersecurity Framework (CSF)" questionnaire template that, if we were to edit it, would contain the 108 questions associated with the NIST CSF framework.
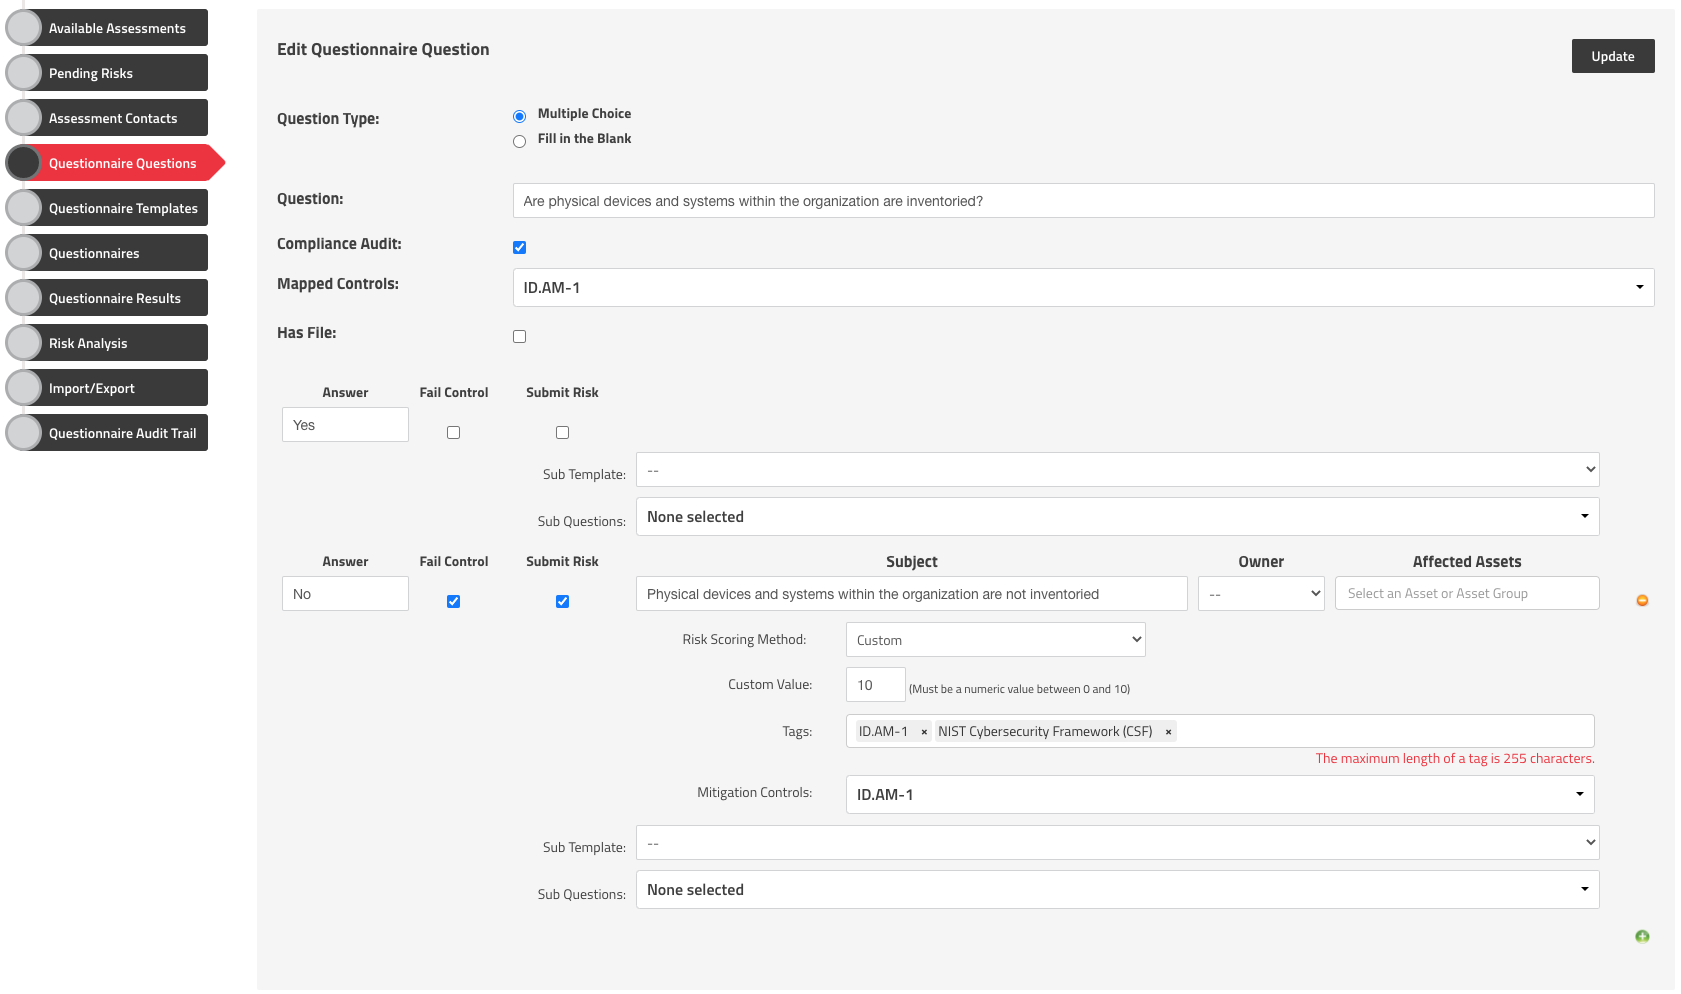
The questions have already been populated for us, but they can be edited by going to the "Questionnaire Questions" menu, filtering for the "NIST Cybersecurity Framework (CSF)" template, further filtering on a question if you need to, and then selecting the edit button next to the question. Here's an example, using the first ID.AM-1 control in the NIST CSF, where you can see how simple it is to change the questions and answers:
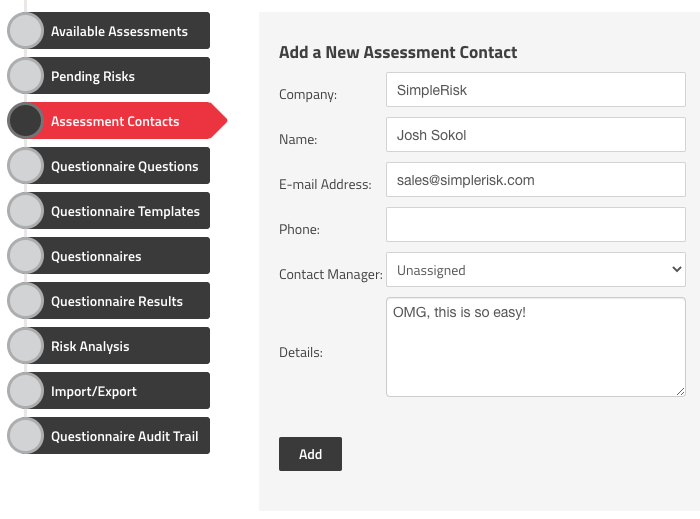
Now, our obvious next step is to send this out as a questionnaire for an assessment. To do that, we need to create a contact that it will go to. We select "Assessments", then "Assessment Contacts" and finally click the "Add" button in the top right corner. Here we can assign the contact to a company, specify their name, define the email address and phone number, assign a contact manager (the person who will receive notice when they complete the assessment) and add additional details.
We're now ready to send a NIST Cybersecurity Framework assessment to our contact! Under the "Assessments" menu, select "Questionnaires" and then click "Add". Here we can define our questionnaire name, provide some instruction to the user receiving the assessment via email, and associate the resulting risks with a project. In the "Templates" section below, we will want to make sure to select our "NIST Cybersecurity Framework (CSF)" template and the assessment contact which we just created.
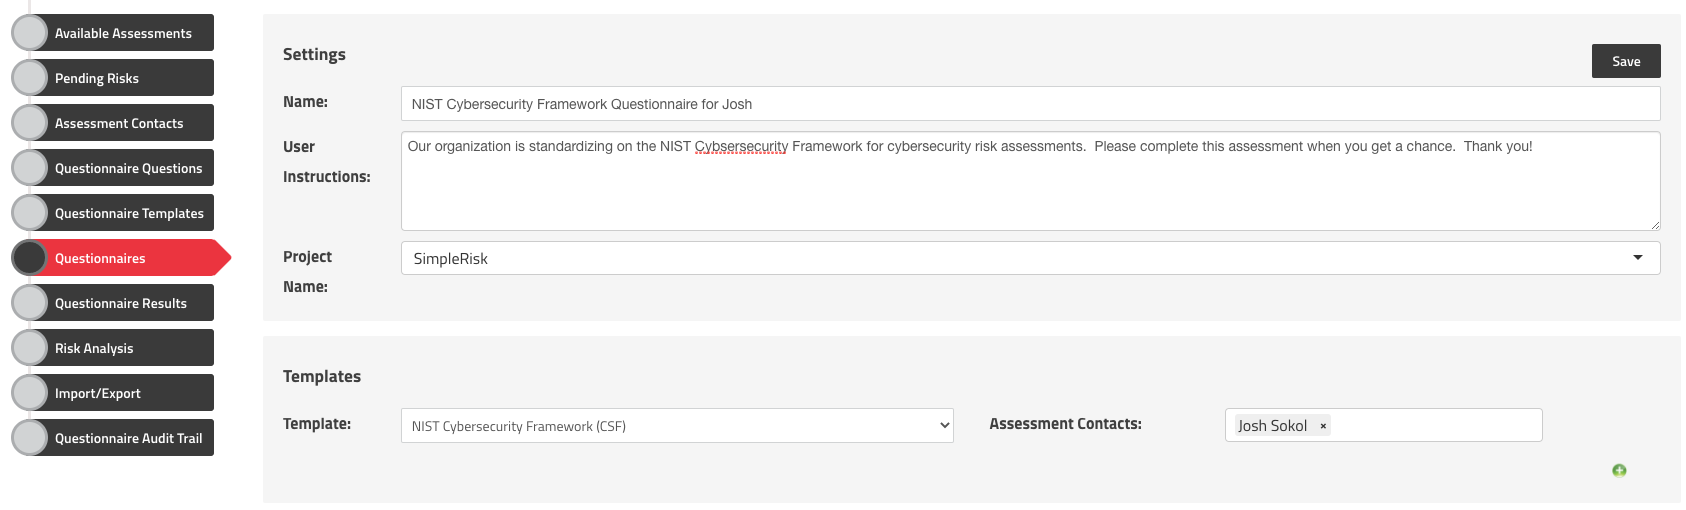
Make sure you click the "Save" button at the top right and then click on the "Questionnaires" menu again to see your new NIST Cybersecurity Framework questionnaire. Click on "Send" and you will be prompted if you want to pre-populate with the answers from your last assessment. Since this is our first time taking this assessment, we can click on "No", but this feature makes it incredibly easy to re-assess without having to fill out every single answer again. The contact which you assigned this assessment to should now receive an email with a link to complete the assessment. Clicking that link will bring you to an assessment page that looks something like this:
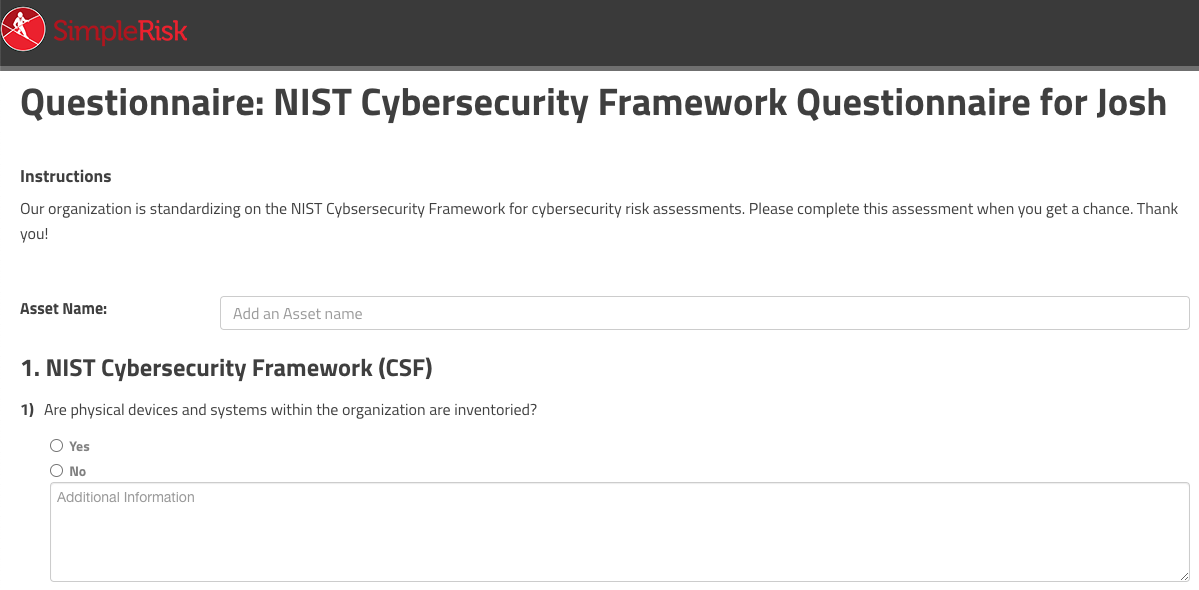
There will be a button at the bottom where supporting files can be attached. Clicking on the "Draft" button will save the current assessment answers, but not notify the Contact Manager that it has been completed yet. Clicking on the "Complete" button will mark the assessment as completed and send an email notifying the Contact Manager.
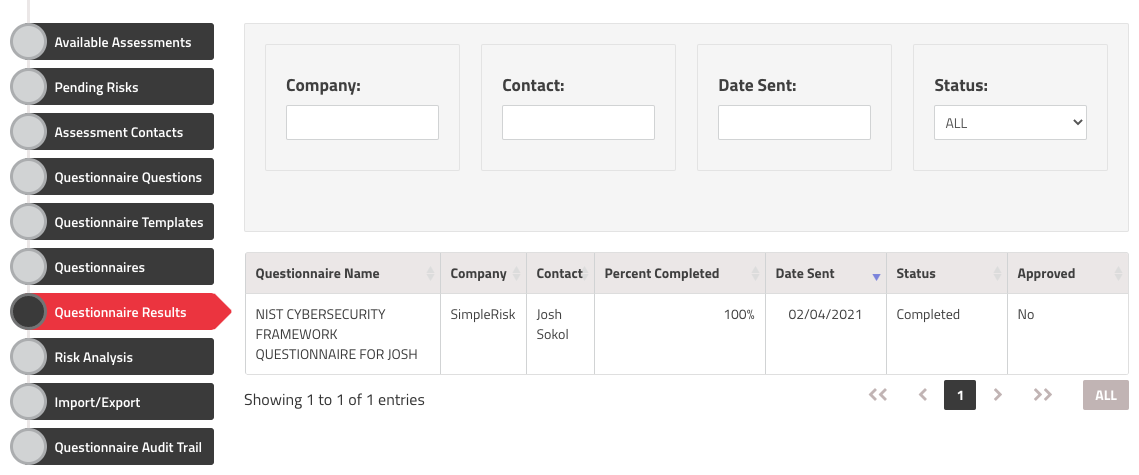
Now that we have a completed assessment, we can go to "Questionnaire Results" to view it. In the screenshot below, we can see the questionnaire name, company, contact name, percent completed, date sent, status and approval information for this questionnaire. We can use the filter options at the top of the page if we are looking for a specific set of results.
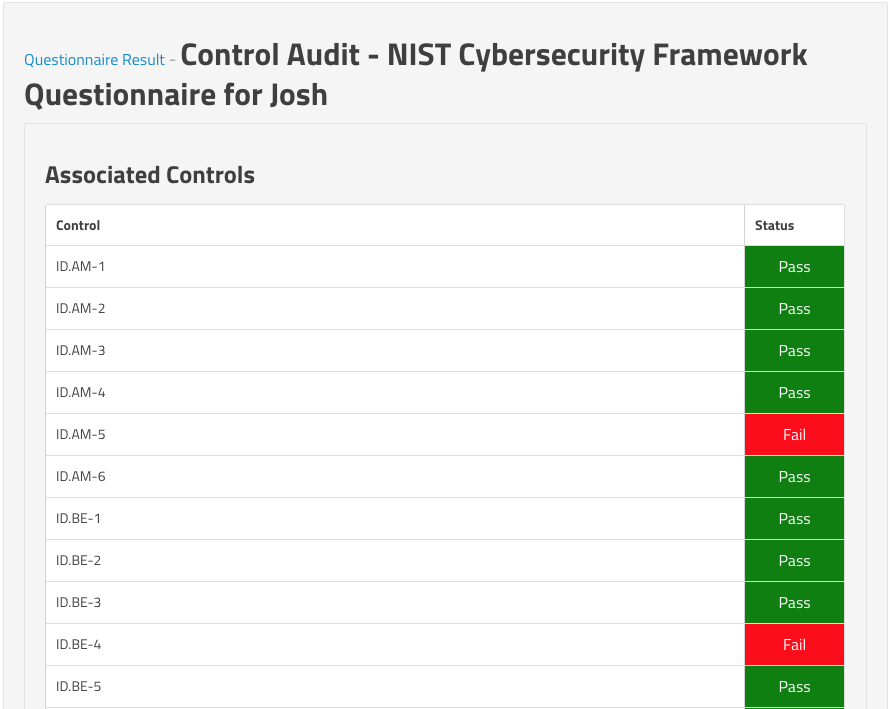
Click on the Questionnaire Name and you will see the results of the assessment. You should see a list of every question asked with the answer in bold below it. If the contact added additional information, you will see that, as well. Along the top you will see options for "Approve" and "Reject". Clicking on "Reject" will allow you to specify a message and kick the assessment back to the original contact for them to change their answers. Clicking on "Approve" will note the date, time and user who is approving the assessment results. You will also see a button along the top labeled "Compare Results". This will give you the ability to compare two different versions of this assessment, enabling you to easily see how the contact's answers have changed over time. The last button along the top is labeled "Control Audit". Since all of our questions were already tied to the NIST Cybersecurity Framework's controls, here we can see the list of each control and our pass or fail status against them.
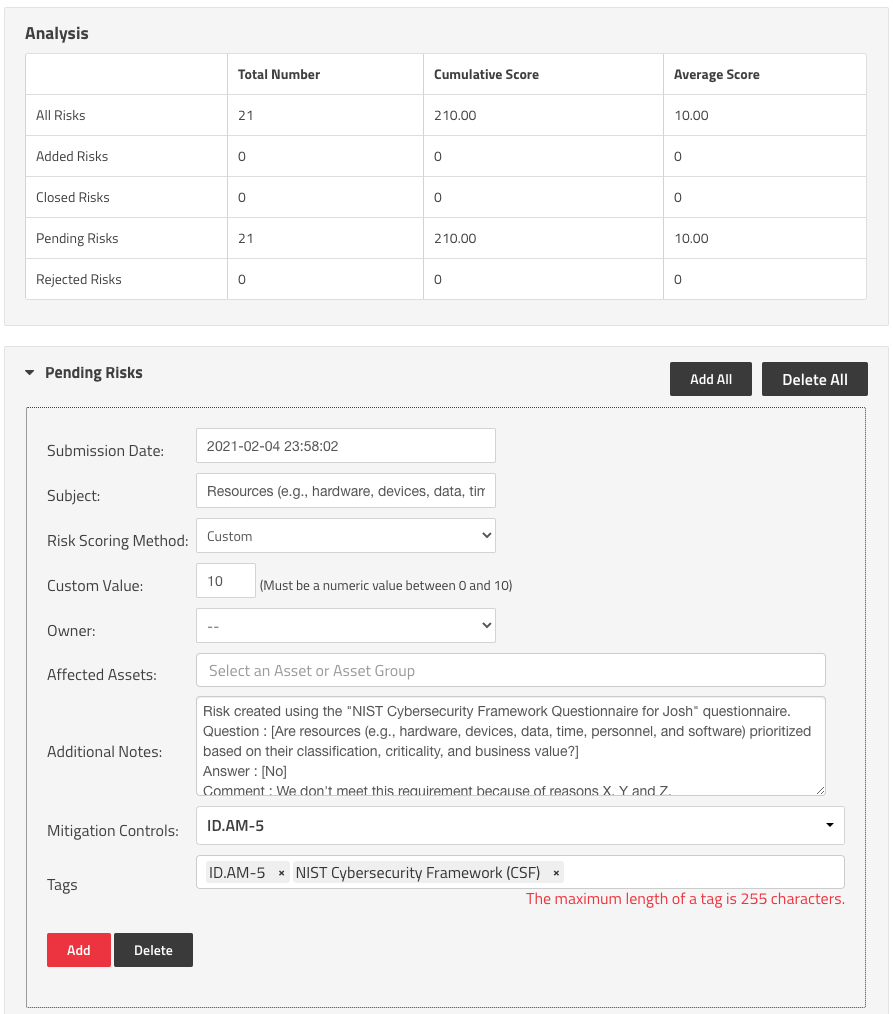
If you scroll down to the bottom of the Questionnaire Result page, you'll see an "Analysis" section which highlights the risks that were created as a result of this assessment. In my case, I have 21 risks that are pending creation based on the contact's answers to the questionnaire. I can manually choose whether to "Add" or "Delete" each individual risk, or I can use the buttons at the top to "Add All" or "Delete All".
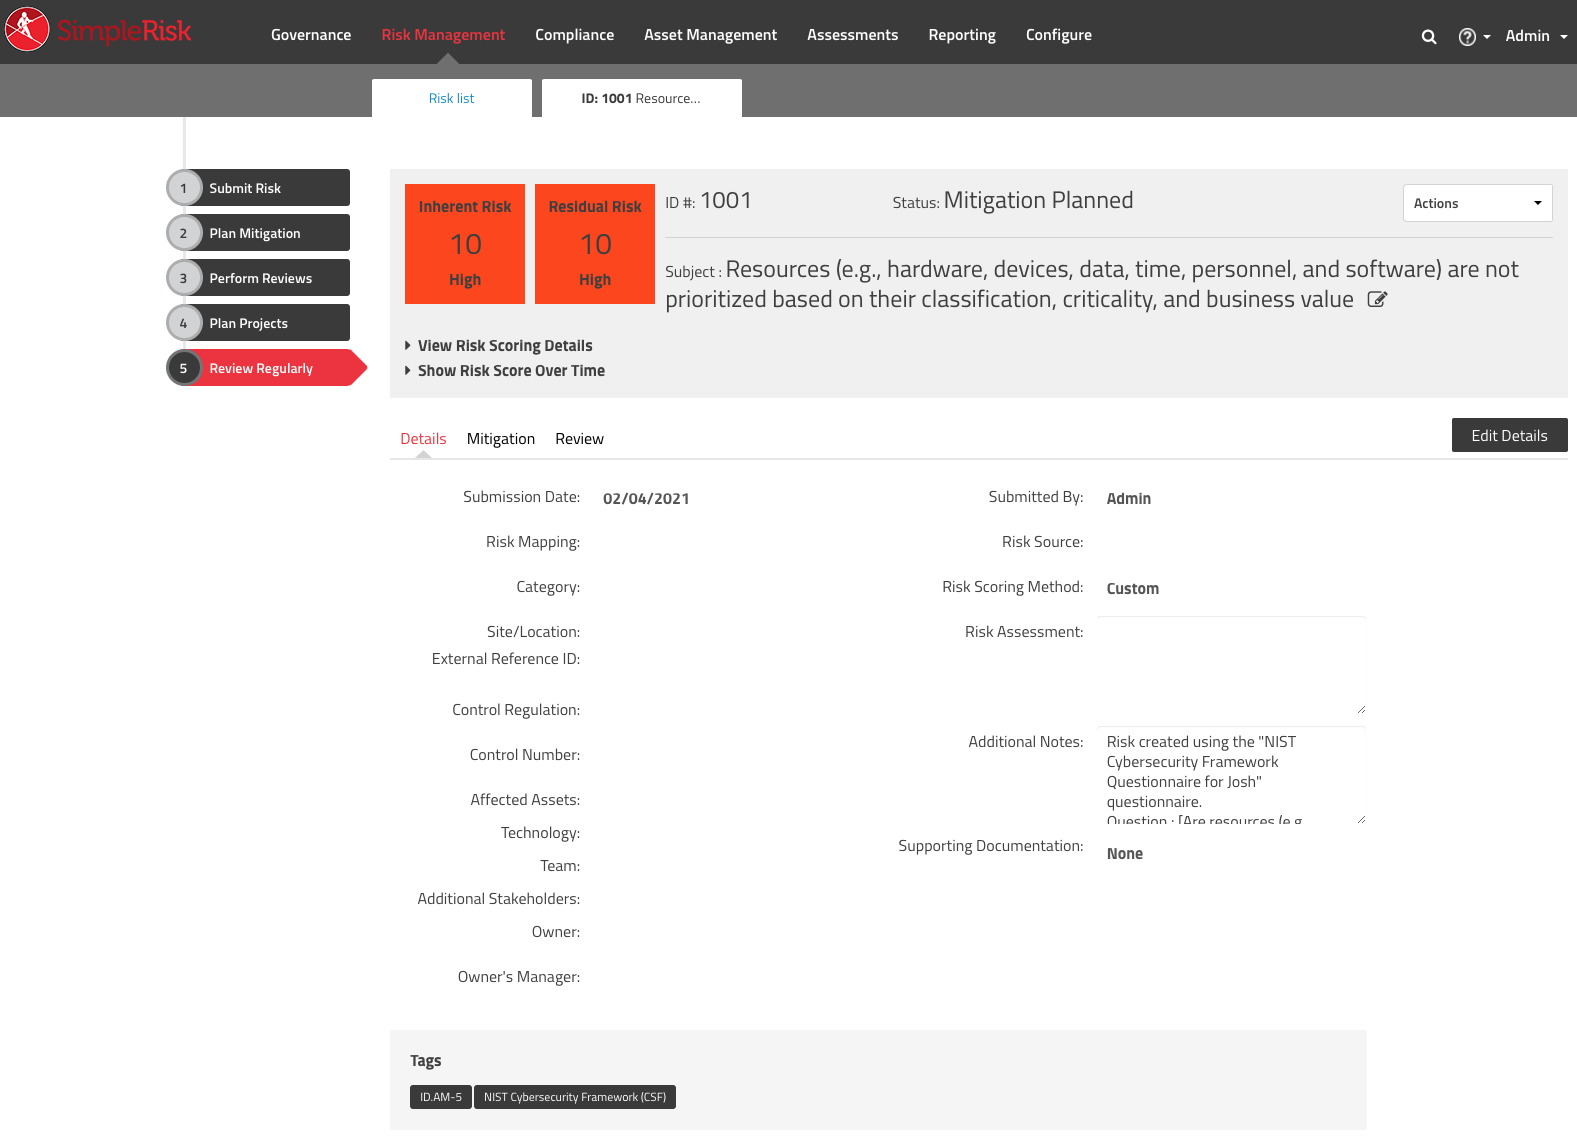
Depending on how many risks are being created, the "Add All" may take a minute or two to complete while it moves your risks from the Pending state to the Active one. With this action, new risks are created in your SimpleRisk system, which are tagged with the NIST CSF control for easy reporting in the Dynamic Risk Report, and the risks are automatically linked to the appropriate control in the Governance section.
Of course, there are plenty more things that you could do with the results from this assessment including viewing assessments by questionnaire or company, visualizing risks in the Connectivity Visualizer, or planning mitigations for these risks, all while ensuring that management has visibility into and accountability for them.
If you're interested in performing a NIST Cybersecurity Framework Risk Assessment for your organization, consider a free 30 day hosted trial for some hands-on experience before your purchase.
Find out more on what Compliance means for your organization: What compliance means in the context of cybersecurity and practicality